Showing posts with label #bloghop. Show all posts

Friday, April 15, 2022

Layered Flowers - Technique Blog Hop

Hello! Welcome to tonights Technique blog hop where we showcase creative ways to use the Layered Flowers Thin Cuts from Close to My Heart. If you are starting the blog hop here with me welcome, if you are joining me from Wendy Kessler's blog, welcome! 


For my project tonight I have created a two page layout using our Cake Day and Mix in papers along with Wildberry which is on special this month. When creating my layout I just cut out a bunch of the different flower shapes in Nectarine, Lemonade, Wildberry, and Glacier and used Green Apple for the leafs with Black in the centre. I had a lot of fun pairing up the colours with really no rhyme or reason, just putting things together and trying to step out of my all things must be matchy matchy! 

Products Used:

Paper:
-Cake Day
- Mar/Apr Mix in paper
- Lemonade, Nectarine, Glacier, Black, White Daisy, Wildberry and Green Apple cardstock.

Thin Cuts:
Z4324 Layered Flowers

Embellishments:
- Z6029 Black Acrylic Alphabet
- RYW057 Simple Serif Uppercase Acrylic Alphabet
- RYW058 Simple Serif Lowercase Acrylic Alphabet
- Z3314 Black and White Dots
- Z4224 Black Shimmer Brush


Tuesday, January 18, 2022

New Product Blog Hop - January - February

Hello and Welcome to the January / February new product blog hop! Tonight we have 13 CTMH makers sharing artwork featuring products in the newest seasonal idea book. If you are joining me from Show and Tell with Michelle you are in the right place! To follow along in the hop just look for the link to the next maker at the bottom of each blog post and click on it to hop on over to the next blog. 


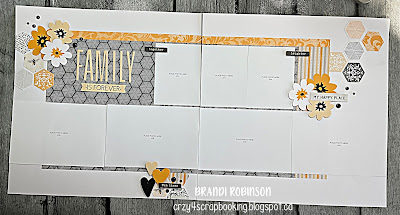
For tonights hop I am sharing a layout I made featuring our Sweet as Honey papers. I created this layout for my monthly worksop. Along the top next to the title it will have three 4X3 photos and just under those will be four 4X6 photos going from end to end across the page. It looks like a lot of white on this page but it will be broken up once pictures are added. 


Products Used:

Paper:
- Sweet as Honey with Sticker sheet
- White Daisy, Sundance, Shortbread, and Black cardstock

Thin Cuts:
- Z4334 Slimline Alphabet

Digital Art:
- Sawyer Digital Art
- Sweet as Honey Digital Art

Stamps:
- B1777 Love You Most

Ink:
- Intense Black

Embellishments:
- Black and White dots

Saturday, January 15, 2022

Let's Get Geometrical

Hello and welcome to the Technique hop for January. Tonight we are all about using Geometric shapes on our projects. If you are joining me from the super talented Katy Taylor, welcome! If you are starting here, welcome! To continue in the hop just scroll to the bottom of each blog post and look for the link to the next consultant and it will hop you right over to their artwork.  Tonight there are 13 Close to My Heart Makers participating in the hop. 


For this card, I used the Close to My Heart card making kit and workshops thin cut to cut the honeycombs out of black cardstock, I chose this for their hexagon shape. I lined them up and added some Sundance for a pop of colour. I am always a fan of clean and simple cards when I see them and wanted to try one myself. 

Products used:

Paper:
- Black, Sundance and Shortbread cardstock. 

Stamps:
- Z4406 Sweet as Honey card making kit
- D2077 Succa for you

Ink:
- Intense Black
- Journaling Pen

Colouring:
- Watercolour Pencils

Embellishments:
- Black and White Dots


Saturday, January 01, 2022

Sweetest Little Things - SOTM Blog Hop

Hello and welcome to the first blog hop of 2022! Tonight we are featuring the CTMH Stamp of the Month for January which is titled Sweet Little Things. If you are joining me from Michelle Loncar from Show and Tell with Michelle you are in the right place! If you are starting here with me, welcome to go through the blog hop all you need to do is click the links at the bottom of each blog post to see how my fellow consultants are using this stamp of the month. 


Now onto the project! I created this card using the Sweet Little Things stamp set. I had no plan in mind, I just played with it and and did what felt right. I wanted to keep it simple. I used Peach card stocks and scored the paper every 1/2 inch and sanded it to bring out the distressed look. I added some of the Jan-Feb Mix in paper which is matted in White Daisy card stock. I used a blending brush to add Glacier (for the sky) and Sage (for the grass) with blending brushes. 

I stamped the bunnies in our Intense Black ink as I was not sure if I was going to use alcohol markers or water colour pencils, I opted for a softer look and went with the water colour pencils. After colouring the sweet bunnies I fussy cut them out and used foam tapes popping them up. I let the card sit for a day or so to see if I felt it needed more but I really liked the simplicity of this one. 


Sunday, August 15, 2021

Technique Hop - Anything Goes!

Hello and welcome to the Technique blog hop tonight we are having a bit of fun and doing an anything goes theme...so there will be a variety of different techniques. If you are joining me from the super talented Haley Dyer, welcome. 


Tonight I tried two techniques, one that I have never done and one that I have but use rarely because I don't often think about it. Here is my layout, it is for my Isabella workshop and the first layout. 


Technique 1 - Tone on Tone stamping. On the Sage card stock, I random stamped the large bloom and a small leaf stamp from the Isabella Scrapbooking Stamp and Thin Cut set and I used Sage ink so that was a subtle touch.  Here are some close ups of the random stamping. 


Technique 2: Colouring Acrylic shapes.  I have heard of others trying and I have been meaning to try it but never really got around to it, until today! I really felt like the White Dots were working on the layout but that I also needed some more pops of the Lemonade colour so I got out my Citrus Blend tri-blend markers and coloured away. I have to say, I love it! I love how easy it was to customize my white acrylic shapes to fit the needs of my layout. 


Products used:

Paper:
- Isabella with Sticker sheet
- Mink, Sage, Lemonade, and White Daisy card stock

Ink:
- Sage

Marker:
- Spectrum Noir Tri-Blend Marker Citrus Blend

Stamp:
- Isabella scrapbooking stamp and thin cut.

Embellishments:
- White Dots and White Acrylic Hearts


Sunday, August 01, 2021

Tutti Frutti - SOTM Blog Hop

Hello! And welcome to the August Stamp of the Month blog hop. Tonight we have 12 consultants featuring artwork using Tutti Fruiti Summer in their artwork. If you are joining me from Darlys Recker you are in the right place! 


Let's take a look at the project I have for you!


I used the Honeycomb embossing folder (sorry, its retired) and paired it with Sundance card stock and sanded the top to expose the white core. I used the Sundance zip strip from the Wander collection and matted it with White Daisy to help it pop. I used our Stitched Circles Thin Cuts and cut one out one of the large with White Daisy card stock. I stamped the "Hello" sentiment in Intense Black. I coloured the lemon with Spectrum Noir Citrus Blend marker. I then stamped the droplets in Sundance in second generation stamping. I finished the card off with two white dots and a white acrylic heart. 


Sunday, July 18, 2021

July-August New Product Blog Hop

Hello and welcome to our blog hop tonight featuring new products that you can find in the CTMH July/August idea book. If you are joining me from the super talented Becca Whitham, welcome!  If you are starting here at my blog, welcome, we are glad to have you! We have 14 consultants sharing projects with us tonight so be sure to scroll through all the blogs by clicking the links at the end of each blog post. 


Now, onto the artwork! For tonight's project I am featuring our Wander paper pack. I love, love, love this paper pack and will be buying lots of it. For me and most of my customers the colours in this one paper was more of a desert feel to it (and while I do have pictures that will work with that from my childhood) living in Ontario, Canada we have more cottage than desert pictures so with the help of my Cricut and the Wander Cricut collection (click here to view it) I changed the feel of the paper to create a more cottage feel for both me and my customers. 


As you can see, this is the original design of the paper:


And I wanted to make a more cottage feel so I used the layout below that comes with the Wander Cricut collection to cut out the sand in Toffee, grass in Evergreen and water inGlacier card stock and layered it over the Paprika, Sundance and Peacock.  I also used the cloud from the layout below but cut them in White Daisy.  


For some added details, I "fussy" cut the title sticker that said Wander apart and popped the letters up with foam dimensional tape. The sun below, I took some Sundance card stock and cut the 2nd largest stitched Circle thin cut and popped it up over the spot where the sun was on the printed paper and stuck a cloud behind the sun. 


To finish the layout off, I added some White dots from the Black and White dots set, some trees that I cut out from the CTMH Timber Cricut collection and added some stickers from the sticker sheet. 

I hope you like the changes I made to this paper to adapt it more to fit the needs of the pictures I have. 


Thursday, July 15, 2021

Interactive Elements

Hello and welcome to our monthly technique blog hop. Tonight we are featuring interactive elements our projects. If you are joining me from Cat Nowak, welcome's you are in the right place! If you are starting with me, welcome!


Today I have a waterfall card I made for a special little guys first birthday. I used up some of my last scraps of Party Time (loved this paper pack, sad it will be leaving us very soon but know something equally great will be replacing it!)

This first card I made for my daughter, she is growing and becoming such a wonderful young woman and I wanted that showing on this card and the interactive part is the spinner with all the things I feel she is like amazing, funny, loved, and so sweet! I used the Deserts a'la whirl for the sentiments for the spinner. I added the puppy because she LOVES all dogs so anything for her has to have a dog on it!


This is a waterfall card I made a while ago, but wanted to feature again as another way to get interactive with your cards. 


I love how looking at the card closed it shows Wishing you a Happy Birthday so you don't have to open it up to see the sentiment but as you pull the tab there are surprises along the way!


Surprises like Balloons....


A party hat and 1st....

and some presents too!


Thursday, July 01, 2021

Strong Roots - July SOTM BH

Hello and welcome to July 1st. Can you believe half of 2021 is already gone? I am shocked that we have made it to July already and being that today is July 1st it means we have another Stamp of the Month blog hop for you tonight. Tonight we have 18 Close to My Heart consultants bringing you artwork featuring the July Stamp of the Month called Strong Roots. If you are joining me from Maureen O'Sullivan welcome, you are in the right place. If you are starting here with me...welcome, we are happy to have you. To follow the hop just click on the links at the end of each blog post to go to the next consultant. 


For my project I wanted to attempt to create a scene which is out of my comfort zone but I need to practice and get better so I figured I would go for it. 


I used my Distress Oxide inks in Peeled Paint and Antique Linen for the ground, I wanted it green for the grass but also with a hint of tan for the dirt too. I think it worked out well. I then sponged some Glacier ink in for the sky. I stamped the image of the house and the sentiment in Memento ink Rich Cocoa colour. I then used my Spectrum Noir Trip-Blend markers to colour in the house and greenery. For the house I used Earth Brown and I used the darker shade on thee roof while keeping to the light and mid shade on the house. For the trees and shrubs I used Dull Green Blend and the path way I tried to create a red brick affect with the Dark Red Blend. 

This is not like any cards I typically created, even my daughter asked if I made it because it did not look like the cards I make. I am happy with it, I feel it needs something but sequins or sparkles just felt out of place on this type of card. 


Tuesday, June 15, 2021

Here Comes the Sun - Technique Blog Hop

Hello and welcome to the June Technique blog hop! This month we are featuring the Sunburst background thin cut from Close to my Heart and how fun (and easy) it is to get fabulous cards or more from this Thin Cut. If you are joining me from Darlys Recker welcome! If you are starting here with me....you are in the right spot to get started. 


Here are two cards I made using the Sunburst Thin Cut. I paired them with the Hillside Cottage paper pack. I also added the Leaf Layers Thin Cut to the right card. 

Here is one I created previously for a challenge. On this one I cute the border of the Sunburst out and then used it as a stencil with my Distress Oxide Inks to show a different way to use this Thin Cut. 


Products Used:

Paper:
- Hillside Cottage
- Black, Flamingo, Blue Belle, New England Ivy, and Canary

Ink:
- Be the Change Card: Intense Black
- Sending Sunshine : Flamingo
- Happy Birthday - Intense Black, Distress Ink Oxides: Mowed Lawn, Spiced Marmalade,    Mustard Seed, Picked Raspberry, Seedless Preserves and Peacock Feathers.

Thin Cuts:
- Z3945 Layered Leafs
- Z3942 Sunburst Background

Embellishments:
- Black and White Dots


I love creating with this Thin Cut, the possibilities are endless with it. I am trying to find a perfect layout to use it on. It is now time to hop on over and see what Lauren Moore created for us tonight. If you get lost along the way, just click here to start at the beginning.


Until next time, happy crafting!

Brandi


Thursday, May 20, 2021

Hillside Cottage - Canada Blog Hop

Hello and welcome to the Canada Hop. Close to my Heart consultants from across Canada have come together to showcase our art working using some of the products in our new May/June Idea book. If you are joining me from Michelle Stewart, welcome! If you are starting with me, just follow the links at the bottom of each post to "hop" on over to the next consultant and their artwork. 

Now for my art work, I am featuring Hillside Cottage this month as it is what I have been playing with for my monthly workshop. This is one of my 3 layouts that I create each month. 


 Products Used:

Paper:
- Hillside Cottage with sticker sheet
- Flamingo, Sundance, and White Daisy card stock

Stamps:
- D1998 Months of the Year - March
- D2015 Hillside Cottage Scrapbooking
- G1230 Hillside Cottage Card making workshop kit

Ink:
- New England Ivy, Canary, Flamingo, Paprika, Blue Belle, Black, and Mink

Embellishments:
- Black and White Dots

Thanks for stopping by my blog today, I welcome any and all feedback. If you would like help with purchasing any of the products mentioned my post today, please contact your local CTMH Maker. If you do not have a CTMH Maker and are in Canada I can absolutely assist you in ordering. If you are in the United States, New Zealand or Australia, I can help you locate a Maker local to you for ordering. 


It is now time to "hop" onto Heather's Paper Playroom and see what fabulous art they have for us. 


Until next time, happy crafting!

Brandi


Tuesday, May 18, 2021

New Products - May/June Idea Book

Hello and welcome to the New Product Blog Hop featuring items from the May/June Idea book. 

I am super excited to see all the new items and what my fellow consultants create with them. If you are joining me from Krista Hershberger welcome! If you are starting here with me, welcome! If you are new to blog "hopping" all you have to do is look for the next consultants name at the end of each blog post and click on it to go onto the next project, it is that simple. Tonight we have 17 consultants participating....so grab a drink or snack and enjoy some crafty goodness with us tonight!

Tonight I have two cards I made using our Mix In paper pack. I always order the Mix In papers and then they get pushed aside and I forget that I have them (yes, I have that much paper that I forget they are there, ok maybe not forget but. blinded by newer stuff!) I liked this Mix In pack a lot so that is why I made sure to play with it!


For this card, the Shine Bright card, the Shoot for the Moon stamp set was on my I want but will I really use it but I like it and want it list...so it was not one I bought right off the hop, we all have those products we like but think is it a need....so I did not buy it and I am so glad I didn't because I actually won it in one of the prize draws for the CTMH online events! That tells me I was meant to have this stamp!


On this card, I used the new Make It From Your Heart Volume 5 (I love this sketch / ideas book) and again used the Mix In papers. For this one, I used B1741 Spot On Sentiments to create this card sentiment saying Just because...I love you. 


Other products used:

Ink:
- Toffee and Blue Belle

Embellishments:
- Black and White Dots

Saturday, May 15, 2021

Just "Distress Oxide" It - Technique Blog Hop

Hello and welcome to the May Technique Blog Hop where we are featuring Distress Oxide Inks as our technique this month. This month we are playing our Distress Oxide Inks. These are new to me so it was fun getting to play with it. If you are joining me from 
Darlys Recker you are in the right place. If you are starting here, welcome! 


My first project is this layout I created. I used the Tattered Rose Distress Oxide™ Ink Pad
Ink to do some shadowing affects behind the title, in the upper right portion of the left page and lower right portion of the right page. This also features the Hillside Cottage paper with sticker sheet. 


On this project I went a bit more bold. I used the Spiced Marmalade and Picked Raspberry and just blended them until I like them, ran it through my die cut machine with the 
Floral Background Thin Cut (Z3693) once I was done inking and cutting it, I spritzed it with some water to get a water spotted affect. I added a 
Stitched Brackets Thin Cuts (Z363) and used Treasured Memories (D1933) for the flowers and sentiments. I added Clear Sparkles (Z3274).


Saturday, May 01, 2021

Flowers For You - SOTM BH

 Hello and welcome to the Close to My Heart Stamp of the Blog Month for May 2021! Tonight we are featuring projects we have created using the Flowers for You Stamp of the Month. If you are joining me from Melinda Everitt you are in the right spot. If you are starting here, welcome! There are 18 consultants participating and to see what each of us created, just click the links at the bottom of each posts. 


Here are the two cards I made using Flowers for You the May Stamp of the Month. The first card is a note card with a hole that was cut out of the top part of the card using the circle thin cut from the shaker thin set. I used the Hillside Cottage papers. On this one I used my Trip-Blend markers: Gold Brown Blend, Antique Pink, Dull Green, and Orange Blend and finished it off with Black Bursts.


My next card I made using just card stock White Daisy and Black. I used the new to CTMH Distress Oxide Inks: Mowed Lawn, Seedless Preserves, Spiced Marmalade, Picked Raspberry and Peacock Feathers. I used the new sunburst thin cut to create a stencil and used the blending tools to rub it on and blend it. I stamped the image and then used the Stitched Circles  to cut it out and coloured with my tri-blend markers. I used Orange Blend, Purple Blend, Blue Turquoise Blend, Orange blend and Pale Pink Blend. To finish it off I stamped the Happy Birthday and added some White Dots. 


Thanks for stopping by my blog today, I welcome any and all feedback. If you would like help with purchasing any of the products mentioned my post today, please contact your local CTMH Maker. If you do not have a CTMH Maker and are in Canada I can absolutely assist you in ordering. If you are in the United States, New Zealand or Australia, I can help you locate a Maker local to you for ordering. 


It is now time to "hop" on over to Katy Taylor at ScrappinKaty and see what fabulous project she has for you tonight. 


Until next time, happy crafting!

Brandi